您现在的位置是:首页 >技术杂谈 >使用VSCode创建第一个ESP-IDF项目网站首页技术杂谈
使用VSCode创建第一个ESP-IDF项目
简介使用VSCode创建第一个ESP-IDF项目
1.在VSCode中安装ESP-IDF:
在 VS Code 中安装 ESP-IDF: 在-VS-Code-中安装-ESP-IDF、新建项目
安装过程中可能会遇到的问题: 解决-pip-安装第三方包时因-SSL-报错_pip-ssl error
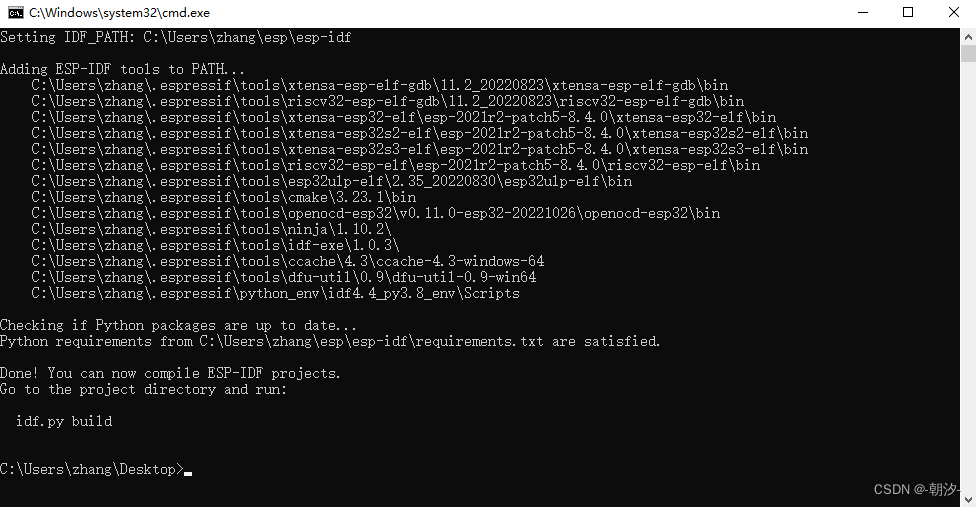
在完全使用VSCode安装ESP-IDF环境后,不会存在ESP-IDF Terminal,而只能在VSCode中使用。所以我们可以通过执行esp-idf安装路径下的export.bat脚本来导出环境变量。下面是在任意路径下创建ESP-IDF Terminal的 bat 脚本
@echo off
set "startdir=%cd%"
start cmd.exe /K "cd {你的esp-idf路径}espesp-idf && export.bat && cd %startdir%"
bat脚本执行结果:
2. 创建第一个项目
创建项目 idf.py create-project [项目名称]

进入项目目录并使用VSCode打开项目

添加ESP-IDF配置文件夹

编写 void app_main(void) 函数
#include <stdio.h>
#include <stdlib.h>
#include "freertos/FreeRTOS.h"
#include "freertos/task.h"
#include "freertos/semphr.h"

static SemaphoreHandle_t sync_task_1;
static SemaphoreHandle_t sync_task_2;
static SemaphoreHandle_t sync_task_3;

volatile int val = 5;

static void vTask1(void *pvParameters)
{
    xSemaphoreTake(sync_task_1, portMAX_DELAY);
    vTaskDelay(pdMS_TO_TICKS(10));

    for(;;)
    {
        printf("task 1 run with %d
", val);
        val--;
        vTaskDelay(pdMS_TO_TICKS(500));
    }
}

static void vTask2(void *pvParameters)
{
    xSemaphoreTake(sync_task_2, portMAX_DELAY);
    vTaskDelay(pdMS_TO_TICKS(10));

    for(;;)
    {
        printf("task 2 run with %d
", val);
        val++;
        vTaskDelay(pdMS_TO_TICKS(500));
    }
}

static void vTask3(void *pvParameters)
{
    xSemaphoreTake(sync_task_3, portMAX_DELAY);
    vTaskDelay(pdMS_TO_TICKS(10));

    for(;;)
    {
        printf("task 3 run
");
        vTaskDelay(pdMS_TO_TICKS(500));
    }
}

void app_main()
{
    //Allow other core to finish initialization
    vTaskDelay(pdMS_TO_TICKS(100));
    UBaseType_t uxPriorityMain = uxTaskPriorityGet(NULL);

    //Create semaphores to synchronize
    sync_task_1 = xSemaphoreCreateBinary();
    sync_task_2 = xSemaphoreCreateBinary();
    sync_task_3 = xSemaphoreCreateBinary();

    // create task
    xTaskCreatePinnedToCore(vTask1, "task 1", 4096, NULL, uxPriorityMain + 1, NULL, tskNO_AFFINITY);
    xTaskCreatePinnedToCore(vTask2, "task 2", 4096, NULL, uxPriorityMain + 2, NULL, tskNO_AFFINITY);
    xTaskCreatePinnedToCore(vTask3, "task 3", 4096, NULL, uxPriorityMain + 3, NULL, tskNO_AFFINITY);

    // start task
    xSemaphoreGive(sync_task_3);
    xSemaphoreGive(sync_task_2);
    xSemaphoreGive(sync_task_1);
}
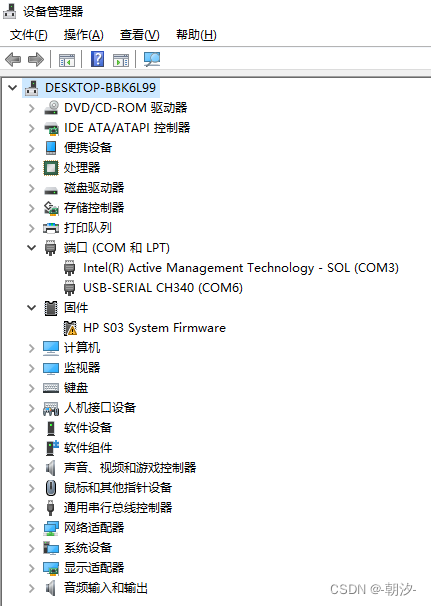
选择COM端口


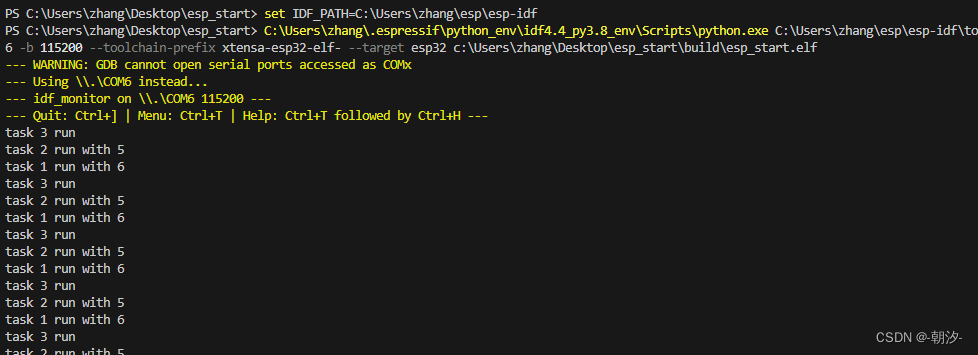
运行项目:按顺序执行build-->flash--->monitor,命令行:idf.py build--->idf.py -p [端口] flash--->idf.py -p [端口] monitor

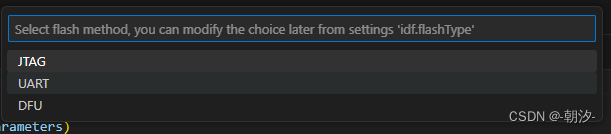
选择调试方式
打开监视器(monitor)
其他:
风语者!平时喜欢研究各种技术,目前在从事后端开发工作,热爱生活、热爱工作。


站长推荐
- QT多线程的5种用法,通过使用线程解决UI主界面的耗时操作代码,防止界面卡死。
 QT多线程的5种用法,通过使用线程解决UI主界面的耗时操作代码,防止界面卡死。...
 - U8W/U8W-Mini使用与常见问题解决
 U8W/U8W-Mini使用与常见问题解决
 - stm32使用HAL库配置串口中断收发数据(保姆级教程)
 stm32使用HAL库配置串口中断收发数据(保姆级教程)
 - 分享几个国内免费的ChatGPT镜像网址(亲测有效)
 分享几个国内免费的ChatGPT镜像网址(亲测有效)
 - Allegro16.6差分等长设置及走线总结
 Allegro16.6差分等长设置及走线总结